6 New Apple Maps Features in iOS 18 to Help You Find Your Way


Go to any tourist location and you will find people with their phones in hand, using a maps app to search for places to visit, restaurants to eat at and of course, directions to their next destination.

If you’re an Apple Maps user, you’ll be happy to hear that there are several new and useful features added to Maps in iOS 18. You can expect easy ways to view popular hikes and topographic views, as well as new ways to organize the places you’ve marked as favorites and the ability to create and save custom routes for later.
You can try out these features now with the iOS 18 public beta (but make sure you know what you’re getting into with prerelease software). In addition to the new Maps features, iOS 18 will shake up the way we use our phones, even ahead of the addition of Apple Intelligence when it comes out later this year.
View topographic maps to understand the lay of the land
When you’re exploring cities and towns, the 3D view in the Maps app is enough to tell whether that quarter-mile hike is a nice flat stroll or an unexpected steep climb. But as you head into rural areas, the topography gets fuzzy.
In Maps on iOS 18, you don’t need the 3D view to get more precise elevation information. As you zoom in on the map, topographic details resolve: first landscape shading, then contour lines, and finally specific elevation numbers.
If you zoom in and don’t see the contour details, you can activate them by dropping a pin. Touch and hold a location until the pin appears.

Zoom in or drop a pin to view topographic details.
Search and follow walks
Hiking in the wilderness is often when you need maps the most, but until now the best the Maps app has offered was directions to trailheads. With the iOS 18 update, Maps includes many popular hiking routes.
Search for “hikes” or “trails” to see which ones are near you or in the area you’re viewing in Maps. When you select one, you’ll see the trailhead, the route, the distance, the estimated duration, the elevation in numbers, and a cross-section of the elevation gained during the hike.
Save the walk to your library, where you can download the route if necessary (highly recommended if you don’t have an internet connection) and make any notes about it.

Apple Maps now includes walking directions.
Create your own walk or hike
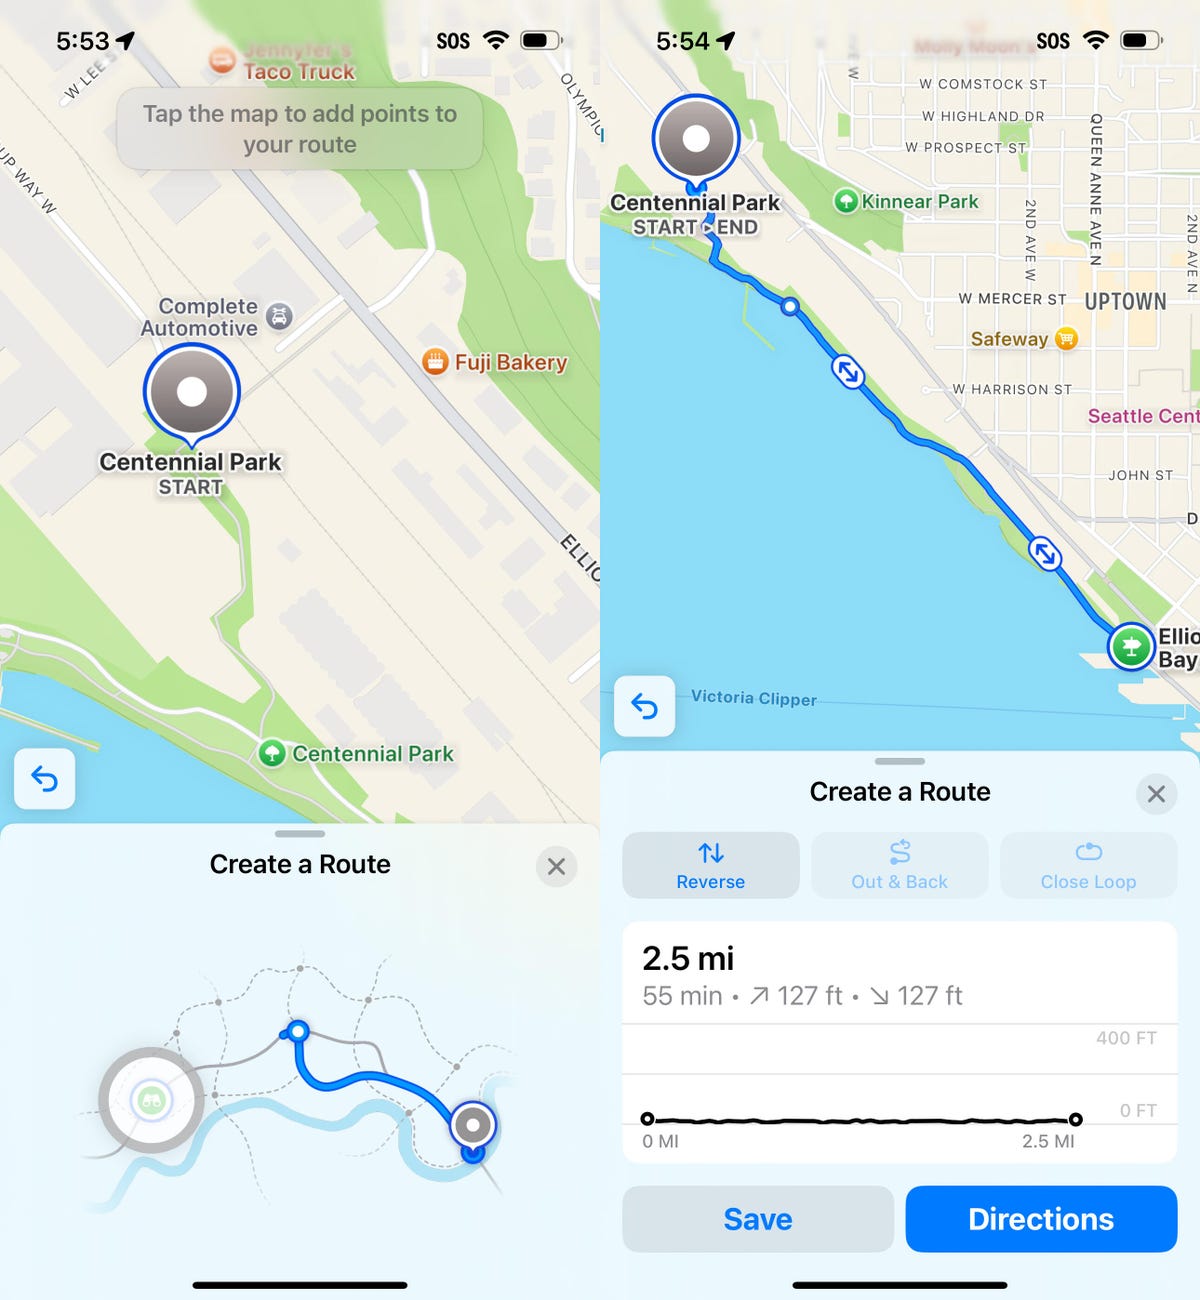
In Maps lingo, a hike is a route, and you can create your own route in addition to the routes already in the Maps database. A route can be anywhere from the woods to your own neighborhood. To create a new route, all you need to do is:
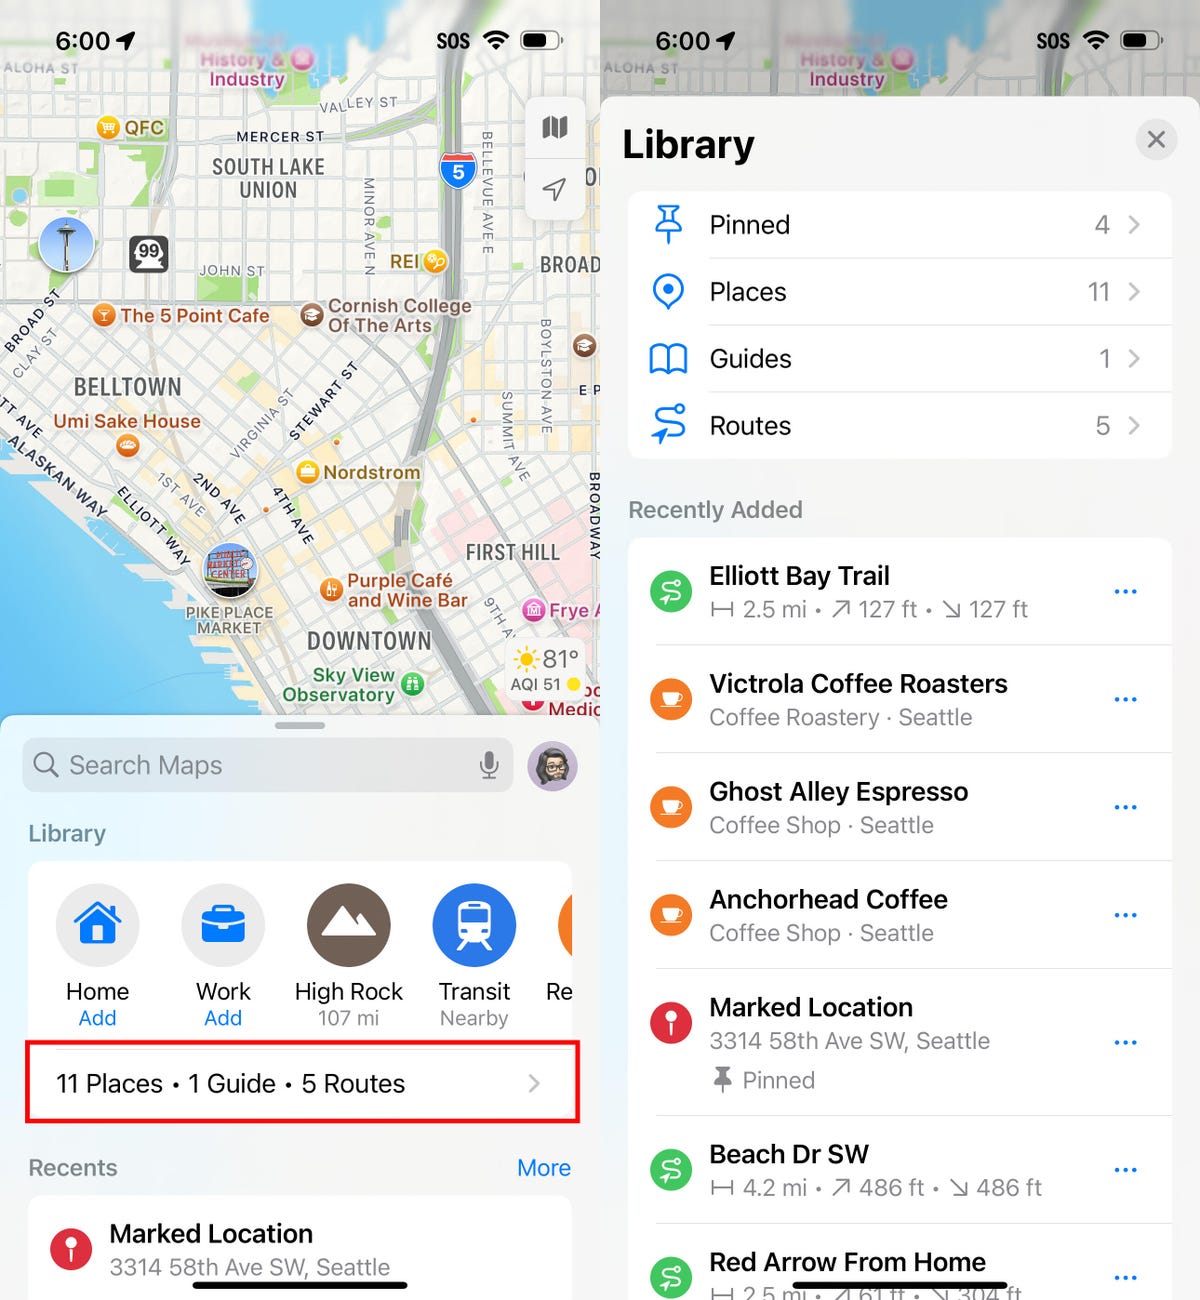
- Expand the search panel to view the library options, which include a button with a summary of your items (for example, ‘7 places • 1 guide • 3 itineraries’).
- Press Routes item in the list and then press the + Create knob.
- Zoom in on the part of the map where the route begins, then tap to create the starting point. Tap to add other points along the route. Maps will attempt to connect the dots to give you directions.
- Crane Back and forth if you follow the same route from the start to the destination and then back again. Or, if you have made a loop and want to return to the start point, tap Close loop.
- Finally, tap To rescue to add the path to the list of routes.

Plan your own walking or hiking route and save it for later.
Your custom routes will sync to iCloud as part of your Maps library, so they’ll appear on your computer and other devices that share your Apple account (the new name for Apple ID starting with this fall’s system updates). Unfortunately, there’s no mechanism for sharing a route with your hiking companions, which would be helpful if you find yourself separated.
Navigate the new library organization
Just as planning a trip can involve dozens of open browser windows and scattered travel guides on your desk, the Maps interface was starting to get cluttered. So in iOS 18, Apple brought some order to everything by organizing it all in your Library.
The library contains four categories of information: pinned locations, places you’ve saved, guides you’ve created or saved, and routes (directions) that you want easy access to.
As part of the change, if you want to save a spot for later, tap + button in the description to throw it into the Places list. Locations you previously marked as Favorites will now appear in a guide called Favorites.

Apple Maps on iOS 18 organizes items in your library.
Dropping and Following More Than One Pin
Since the first incarnation of the Maps app, you could drop a pin anywhere to mark a location. It didn’t rely on Maps’ database of locations: you could set a spot and then navigate back to it (great for marking the pedestrian entrance to a parking garage, for example).
But like the Highlander of old, there could only be one. If you dropped a pin in a different spot, the previous pin would disappear.
Now that limitation is finally gone. When you touch and hold a spot on the map, it becomes a highlighted location. Swipe up to see more information about that point, then tap Pin at the bottom to save it as a pinned location.
It will be saved to your library in the list of pinned places.

Multiple marked locations can be created and saved as pinned items.
Not new, but essential: download offline maps
This isn’t a new feature in iOS 18, but it could be as essential as a compass for some additions. Since most hikes will be outside of cell phone range, remember that you can download an offline map of the area you’re in before you get there.
Tap a location or set a pin, then tap Download button; if you don’t see it under the place name, you may need to tap the button More button to choose Download map from the menu. Zoom in or out to select the area you want to include in the frame. Tap the Download button in this view to save the map data about the area on the iPhone.

Download offline maps of the places you’ll be hiking so you’re not dependent on an internet connection.
iOS 18 brings a host of new features, some available in beta now and others coming this fall. Learn about the new features in Messages and how the Photos app is getting a reorganization.


