How to Turn an Old WiFi Router into an Access Point


In general, you’ll want to replace your Wi-Fi router about every five years. But if you’re replacing your old Wi-Fi router with a newer one, you can either spend time trying to convince someone to offload your five-year-old router, or you can turn it into an external access point, or AP. By placing this DIY AP on the other side of your house and connecting it to your new router (via a long network cable), you can bring Wi-Fi to your home without spending hundreds of dollars on a brand new mesh system.
Your home Wi-Fi router has an embedded AP (or even two or three embedded APs in the case of a dual-band or tri-band router) in addition to its function as a basic router. APs broadcast Wi-Fi signals that wireless clients such as smartphones, tablets, and laptops can connect to.
For the purposes of this guide, we’ll refer to the new router hosting your home network as Router A. The old, broken one that you’ll be turning into an AP is Router B. The goal here is to have Router B function as a remote AP for Router A.

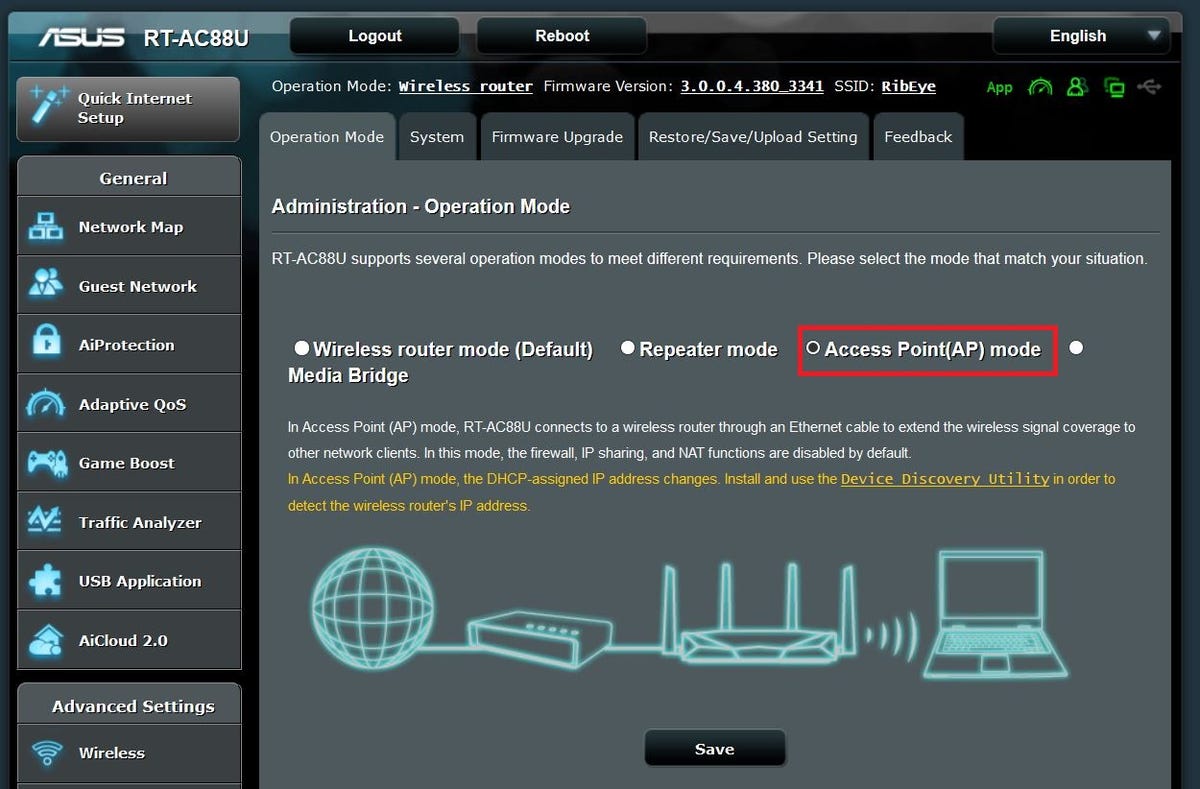
Many routers in recent years can operate in Access Point mode. This mode can be enabled via the interface.
Note that some Wi-Fi routers have an Access Point mode (you will see it in the list of features if so). If that is the case for your Router B, you can simply enable this mode and it will start working as an AP. This guide is only necessary for Wi-Fi routers that do not have this feature (or if you do not know how to enable it) and is only suitable for routers that have a web interface, which is fortunately the case for most routers on the market.
General Direction (for Network Experts)
If you are familiar with configuring routers and networks in general, here is what you should do.
1. Cover the WAN (internet) port on Router B with a piece of tape. You don’t want to use the port, because otherwise you won’t be able to turn the router into an AP.
2. Find out what the IP address range of Router A is. For example, if Router A’s IP address is 192.168.1.1, then we can safely assume that the IP pool ranges from 192.168.1.2 to 192.168.1.254.
3. Manually set Router B’s IP address to an unused IP within Router A’s IP range. For example, you could set it to 192.168. 1.2. Just make sure that you have not and will not manually use this IP for another device.
4Disable the DHCP function of Router B.
And you’re done. Now when you connect Router B (which is no longer a router) to Router A using a network cable (LAN port to LAN port), it will function as an Access Point, giving you better Wi-Fi coverage for your devices.
Detailed steps (for beginners)
Step 1: Ignore the WAN (internet) port of router B.
If your router doesn’t have a native AP mode, you won’t want to use the WAN port at all. By using the WAN, the router automatically functions as a router, because that’s its intended role: a router connects to the internet and shares that connection with the rest of the network it hosts. That’s no longer the function of Router B in our project. Leave that port alone, or cover it with a piece of tape to prevent accidental use.
(Note: For routers that have a native AP mode, you’re actually using the WAN port. In AP mode, it functions as a LAN port, allowing you — and in this particular case only — to use the port to add another wired device to the network.)

The IP address of a network’s router is easy to find out.
Step 2: Find out what the IP address range of Router A is.
This is a two-part step. First, you need to find out the IP address of Router A. Connect a computer to Router A via Wi-Fi or with a network cable via one of the LAN ports.
If it is a Windows computer:
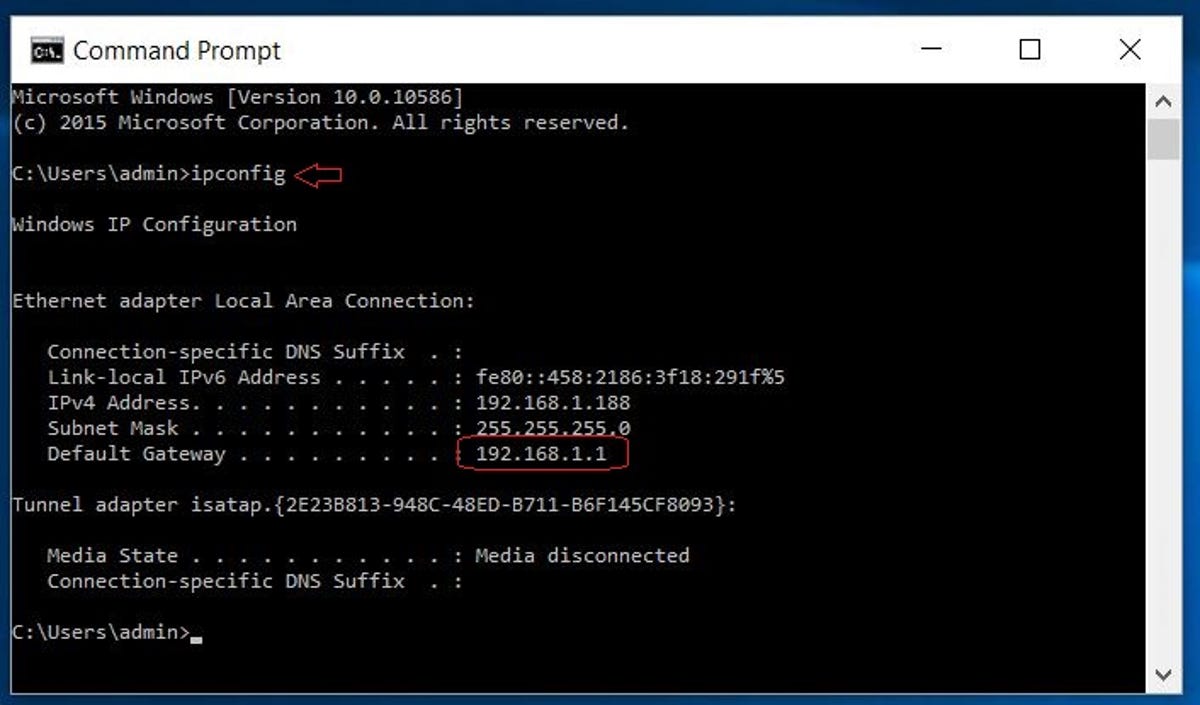
- Run the command prompt. You can use the keyboard shortcut Windows key + R and then type “cmd” and press Enter.
- In the command prompt window, type: ip configuration then press Enter. You’ll see a bunch of potentially confusing numbers and words, but the IP address to the right of “Default Gateway:” is the router’s address. That’s the number you want.
Or on a Mac:
Go to System SettingsThan Networkthen find the currently connected connection (you should see a green dot indicating the connection is working), then click Details next to it. The router’s IP address is displayed at the bottom.
Once you have the router’s IP address (which is always four groups of numbers separated by a period between each group), use it to determine the IP range. The range of numbers you can choose from uses the same numbers for the first three groups, with the last group ranging from 1 to 254. The router’s current IP address is not available for use.
For example, if the router’s IP address is 192.168.1.1, then the IP pool of addresses will range from 192.168.1.2 to 192.168.1.254. If the router’s IP is 192.168.1.254, then the IP range will be 192.168.1.1 to 192.168.1.253. When a device is connected to Router A and has an IP address within its IP range, it will be accepted as part of the network. It would take a whole separate video and article to explain why it works this way, but rest assured that it does.
For the purposes of this guide, we’ll assume that the IP address of Router A is 192.168. 1.1. This will likely be the case for you as well, as many home routers (from brands like Netgear, Asus, and D-Link) use this IP address by default.
Step 3: Set Router B’s IP address as an unused IP address within Router A’s IP range (don’t worry, we’ll explain what that means below).
Connect a computer to Router B via Wi-Fi or with a network cable via one of the LAN ports to find out what the router’s current IP address is (to do this, repeat the first part of step 2 above).
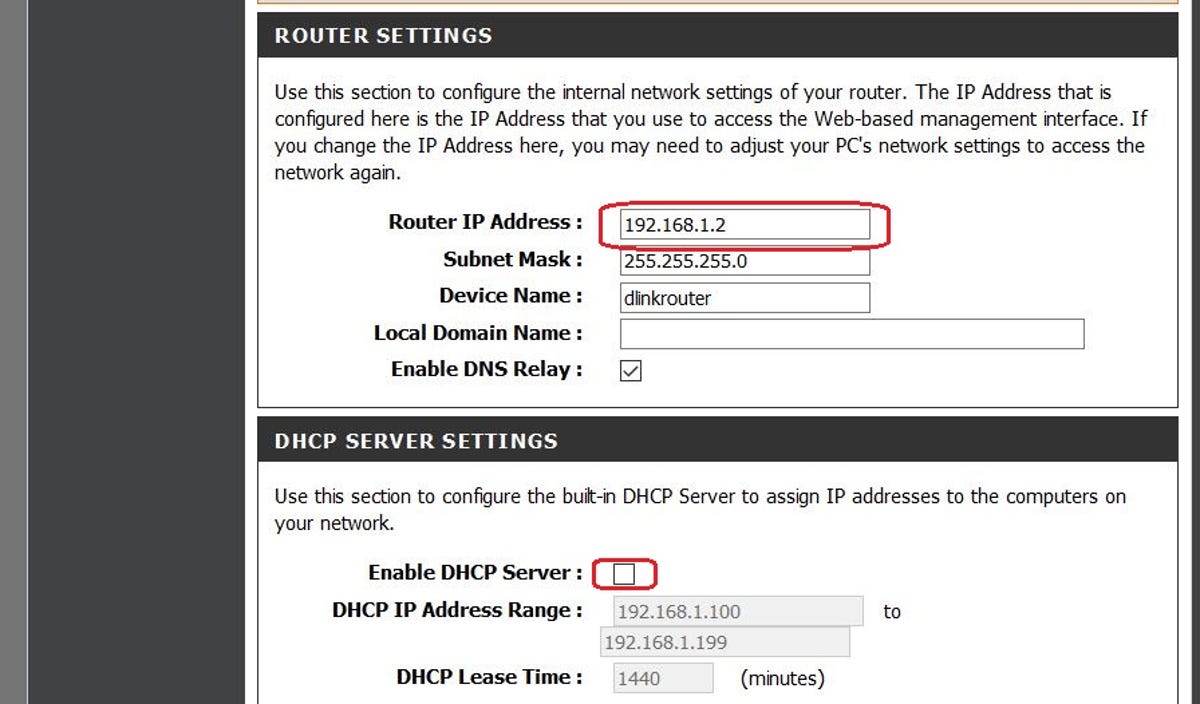
Log into the router’s web interface by pointing a browser to its IP address. Within the interface, navigate to the section where you can change the default IP address. Depending on the router, this section will usually be called Network, LAN, or Setup. Change this IP address to one of the addresses in the IP pool determined in the second part of Step 2 above. For example, if Router A’s IP is 192.168. 1.1, you could set Router B’s IP to 192.168. 1.2 (make sure you haven’t manually assigned this IP address to another device; if you have, choose a different IP address instead) and then save the changes. Router B will now likely reboot to apply the changes, which will take a minute or two.

By disabling the old router’s DHCP server function and assigning an unused IP address to the main router, the router is forced to act as an access point when the WAN port is not in use.
Step 4: Disable the DHCP server function of Router B.
Log back into Router B’s interface by pointing a browser to the new IP address you manually set in step 3 (in our case it was 192.168. 1.2) and then navigate to the LAN or Network configuration section again. Disable the DHCP server feature here. This is one of the main functions of a router that leases IP addresses and you don’t want that at this point, so make sure it’s disabled. Save the changes and you’re all set.
(Depending on the interface, some routers allow you to perform steps 3 and 4 at once, without rebooting.)
Now, Router B, when connected to Router A using a network cable, will function as both a switch (allowing you to use its LAN port to add wired devices to the network) and an access point. You can always log into the interface of either router using their IP address — 192.168. 1.1 (Router A) or 192.168. 1.2 (Router B) in the case of this guide — to change their settings or customize their Wi-Fi networks.
If you don’t change any settings, Router B (now working as an AP) will still have the same name as when you were using it as a router. You can change the name to match Router A’s if you want devices to automatically connect to either one, or keep the names separate if you want to make sure you’re connected to either Router A or Router B. Either way, all devices connected to either router will be part of the same network.


